|
 Video
processors are not typically embedded in microcontrollers, so
using the external video display unit is considered in gaming
consoles. As this is the minimalistic project, VGA video signal is
generated by software, based on interrupt driven kernel. Video
processors are not typically embedded in microcontrollers, so
using the external video display unit is considered in gaming
consoles. As this is the minimalistic project, VGA video signal is
generated by software, based on interrupt driven kernel.
The
routine which generates VGA signal is the part of
T2 (Timer 2 module) interrupt service
routine. This routine also services vertical sync pulse, markers
for monitor auto adjustment and the bottom line text routine. At
this version, no other interrupts are active, but the user can add
his own interrupt sources, as long as they have the lower
priority level.
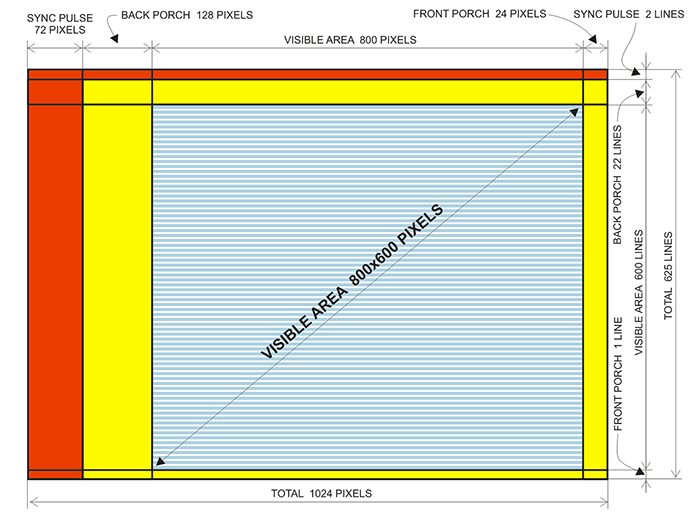
Timing details
VGA
timings for resolution 800x600 in 56Hz refresh
rate are represented on the drawing. Here are detailed
timings data:
Horizontal
timing:
Pixel clock: 36 MHz
(13.89 ns)
Horizontal frequency/period: 35.16 KHz (28.44 us)
Visible area: 800 pixels (22.22 us)
Front porch: 24 pixels (0.67 us)
Sync pulse: 72 pixels (2 us)
Back porch: 128 pixels (3.56 us)
Vertical
timing:
Vertical
frequency/period: 56 Hz (17.86 ms)
Visible area: 600 lines (17.067 ms)
Front porch: 1 line (28.44 us)
Sync pulse: 2 lines (56.89 us)
Back porch: 22 lines (625.78 us)
Whole frame: 625 lines (17.78 ms)
Dot clock for
800x600 resolution @ 56 Hz vertical frequency is
exactly 36 MHz, and the maximum execution speed for
PIC24E family is 70 MIPS. So the
MCU has to be slightly overclocked to 72 MHz to
get the desired instruction/pixel clock rate. This overclocking is
only 2.8%, which is
negligible and will not noticeable affect operational safety or thermal
dissipation.
As it was noted,
each pixel takes the place of 2x2 pixels area, so the actual dot clock is not 36 but 18 MHz.
That gives enough time to the processor to execute four instructions
in one pixel timing. In addition, every scan line is displayed
twice, so there is even more time for buffer setup during
horizontal sync and porches.
RAM organization
Video memory is
located in internal
48 KB RAM, where it occupies 45600 bytes. All video signal timings match VGA standard in 800x600 mode,
but, due to RAM limitations, the actuual displayed resolution is only
380x240, and it is displayed on 760x480
pixels original screen area.
To use the whole 800x600 display area in
8-bit pixel mode, we need 800x600=480,000 bytes of memory, but
in the best case, all that PIC microcontrollers offer at this
time is only 48K (49,152 bytes), which is too far from what we need. There are some 16-bit PICs with
96K RAM, but they are too
slow for video signal generation, and some 52K PICS,
but they are in SMD 64-pin packages with 0.5 mm pitch, which is
quite unconvenient for DIY projects. Although it is possible
to add external RAM, it is of no practical use, as the access to the
external RAM would be too slow. So we have to do it with
48K RAM MCUs somehow.
To do that, we have to make some copromises:
1. The colour of each pixel is defined by four bits only, so it works in
16-colour mode. In fact, only 15 colours are used, as one of them
(binary represened as 0000) does not mean "black" but "transparent",
which shalll be used in sprite handling. More about that later.
2. Each pixel from the video memory is displayed on 4-pixel (2x2)
area of the VGA screen.
3. Actual displayed resolution is 380x240, which occupies 760x480
pixels on the screen. The 20 pixel wide margin on the top, left and
right side of the monitor are not used and are left black. At the
bottom there is one line (39 characters) of text. It needs no frame
buffer, as the routine interprets text directly from the text buffer in RAM.
This organization gives 380x240=91,200 graphical pixels, but as
each pixel is covered by 4 bits, the video memory needs only
91,200/2=45,600 bytes of memory. Bottom line text needs no video
buffer and it occupies only 78
bytes (39 for text and 39 for colour attributes). So there are
49,152-45,678=3,474 free bytes, which is quite enough for housekeeping
(internal buffers and general purpose registers).
Sprites
With the processing power of 72 MIPS, it would be easy to generate the video signal
by software, if
the only requirement is to show the contents of video memory. As
there is no video processing unit here and the MCU has to handle
one pixel at a time, such concept would be useful for static
images or very small movable blocks of pixels, but not for the
game, which requires real time processing of large memory blocks.
To make things worse, more than 1/3 of the time CPU is busy
generating video signal, which leaves only 1/3 for housekeeping
and active memory handling.
The solution to this problem is to use sprites,
which are 2D images located outside the video RAM, and somehow
superimposed in the main scene. Video units in some of the first
personal computers could handle sprites in hardware, but in this
project it is realized in software. The sprites are in internal
program memory of the MCU and they are combined with video RAM
contents to generate the full video signal. That means that there
is no way to manipulate the sprite contents, it can only be
displayed at the desired location of the screen. As the most of characters in
this game are animated, there is a large number of pixels, and
each of them represents one frame of that pixel in the
animation. Here is the example of Jack's jump. Note
that X and Y absolute position on the screen is permanently
adjusted during
the jump, as well as the order of slides in the jump sequence
(which is listed in the script table in the firmware), so it gives
much more freedom in creating the Mise en scène for the
game - this jump is, in reality, much higher and lasts longer than
it may look while just watching those slides. So there is no need
to draw the equal slides again, as each of them can be called repeatedly
in the script table. In this example, the last five slides are
repeated only because of the hair splash, otherwise slides 11, 12,
13, 14 and 15 could be ommited and listed as 9, 8,
6, 4 and 3 in the script. The same slides are used for jump up and
for jump down to the lower floor, but with different script
tables.
 |
All that software has to do while servicing the video scenario, is
to preset the special sprite registers, determining X and Y
positions (relative to the left and upper border of the active
portion of the screen),
width and height of one slide image, and address of the current
slide in program memory. Video firmware, located in the interrupt
routine, will superimpose that sprite in the content of the
background video memory during RGB signal generation.
One more thing to note is that the orange colour in sprites
means "transparent" (there is no orange colour in the
game pallete, only in the pallete of the PC drawing program during
sprite design process).
Each orange pixel on the sprite will be displayed from the video memory, which will
typically hold the background image. Yet, there is one drawback of
this princip. If two or more sprites are overlapping, then
transparent (orange) pixels on the
first of them (which holds the highest priority, that means which
is located higher on the special sprite table in RAM) will partly covered
the lower sprite, displaying the background instead of lower
sprite's active pixels. The first (simulated) screenshot
shows that example.

There is the way to solve this problem, but only for the
limited number of sprites. Some sprites can be treated as
"special", and they do not have that drawback (see the second screenshot).
The only problem with those sprites is that they require 18 times
more time for the video routine to execute, so programmer has to
take care not to use this option if it is not necessarry, as it
could result in losing scan lines on the screen.

How to tell to the video routine which sprite is special, and
which is not? The sprite list (located in RAM and named SPRITELIST) holds
pointers for active sprites. The video routine can place (or erase) any
sprite at that list at any time, and at any table position which
is not currently occupied. This table can hold the
maximum of 20 sprites at the same time. Only four sprites (number
17, 18, 19 and 20) are
treated as "special" ones - they are executed much slower, but they
do not generate the described problem in overlapping conflict, or
at least it is minimized so that it is not noticeable. In
this game, only one sprite (Jack itself) has that privilege, as
the game scenario is such that all other sprites will never be
overlapped.
Theory of operation
The most significant part of the video routine uses SPRITEBUFFER,
which is 190 bytes long (equal to one scan line in video memory),
and in which the video routine prepares the sprite contents for
the current line, before it merges it with background image and outputs that scan line. So the video memory
has two layers: the lower
layer is the large video memory itself, which mainly contains background
picture, and the upper layer, which is only one scan line large and which contains
pixels for that line. Those pixels are copied from the sprite
tables located in program memory, before the video routine starts
outputing data. So, this layer is dynamicaly changed for each scan line (more
specifically, each two equal scan lines) during the horizontal
sync and back and front horizontal proch.
Here is how the video routine outputs RGB video signal to the port
pins B8, B10, B12 and B14 (Red, Green, Blue and Intensity,
respectively). Four instructions (total of 55.55 ns) are used for
single pixel, and
this part of program (repeated 190 times) outputs
380 pixels. Odd pixels (1, 3, 5...) are generated when bits
#0, #2, #4 and #6 from the
corresponding byte of SPRITEBUFFER are copied to port pins
B8, B10, B12 and B14 (red listing), and even pixels
(2, 4, 6...)
are generated the same way, except they are rotated, so that bits
#1, #3, #5 and #7 are copied to the same pins (blue
listing). W13 register already points to the high
byte of LATB register (not shown on the listing), w3 register
points to the start of SPRITEBUFFER minus 1, and w12 register
contains offset from SPRITEBUFFER to the main background (video
memory) buffer (it should be correctly calculated before each scan
line execution). W7 and w14 are simple masks used for odd/even
pixels separation.
If you have to redesign the hardware of this project, you must
know that the
remaining bits of high byte LATB portion (#9, #11, #13 and #15)
can not be used for simple output function, as they will be
corrupted in this routine (this does not apply to remapable pin
functions, as they are not altered by witing to LATB). As you can se, each
4-instruction part (both blue and red) first fetch the single byte
from SPRITEBUFFER and tests it for zero at the same time. If it is
zero (if the pixel in the sprite contains "transparent colour"), it
fetches the pixel content from the video memory. At last, the
pixel (whether it is from sprite or background) is outputed to the
port. Here follows the
vital part of video routine:
mov
#0b10101010,w7 ; mask bits
1,3,5,7
to isolate even pixels
mov #0b01010101,w14 ; mask bits
0,2,4,6
to isolate odd pixels
.rept 190
and.b
w14,[++w3],w0 ; get
next
byte from SPRITEBUFFER, test bits
0,2,4,6
btsc SR,#Z ; if bits
(0|2|4|6)≠0, then skip next
instruction
mov.b [w3+w12],w0 ; ...
else get background pixel from video mem
mov.b
w0,[w13] ; ***
ODD
pixel out
and.b w7,[w3],w0 ; get same
byte from SPRITEBUFFER, test bits
1,3,5,7
btsc SR,#Z ; if bits
(1|3|5|7)≠0, then skip next
instruction
mov.b [w3+w12],w0 ; ...
else get background pixel from video mem
lsr.b w0,[w13] ; *** EVEN
pixel out
.endr |
 Of course, SPRITEBUFFER must be properly loaded with sprite pixels before
current scan line starts. This can be done only during horizontal sync and
back and front horizontal porches, and it leaves 6.23 us (about
448 instructions) which can be used for SPRITEBUFFER preparation.
In reality, som of those instructions will be spent on register
presets and w12 (offset) calculation, horizontal sync
synchronization and SPRITEBUFFER clearing at the beginning, so in the best case we can count on about
300 instructions. This is surely not enough time to test 20
possible sprites, to check if they exist in the current scan line, calculate
position inside sprite lookup table and to move their contents
from program memory to the SPRITEBUFFER. Most of the time will be
spent on the last item, reading program memory and moving its
contents to the SPRITEBUFFER. To make
things worse, reading from program memory takes 5 instruction
cycles for each word, but, luckily, if you use PSV (Program Space
Visibility) mode, only the first word transfer will take 5 instruction
cycles, and the others only one. This is, of course, used in this
project, otherwise it would not be possible. Of course, SPRITEBUFFER must be properly loaded with sprite pixels before
current scan line starts. This can be done only during horizontal sync and
back and front horizontal porches, and it leaves 6.23 us (about
448 instructions) which can be used for SPRITEBUFFER preparation.
In reality, som of those instructions will be spent on register
presets and w12 (offset) calculation, horizontal sync
synchronization and SPRITEBUFFER clearing at the beginning, so in the best case we can count on about
300 instructions. This is surely not enough time to test 20
possible sprites, to check if they exist in the current scan line, calculate
position inside sprite lookup table and to move their contents
from program memory to the SPRITEBUFFER. Most of the time will be
spent on the last item, reading program memory and moving its
contents to the SPRITEBUFFER. To make
things worse, reading from program memory takes 5 instruction
cycles for each word, but, luckily, if you use PSV (Program Space
Visibility) mode, only the first word transfer will take 5 instruction
cycles, and the others only one. This is, of course, used in this
project, otherwise it would not be possible.
Unfortunately, this is valid only if you move 16-bit words in PSV
mode (e.g. mov [w3++],[w4++]),
but if you use the same technique in byte mode (e.g.
mov.b [w3++],[w4++])
you still need 5 instruction cycles for every byte (this is not
documented in Microchip's manuals, so I had to learn it the
harder way).
The consequence for this PIC24E drawback is that it is not
possible to move the single byte (2 pixels) of video content, but only word by word, which is
4 pixels. So the X pointer for each sprite should point to 0, 4,
8, 12, 16, 20... and not to the locations
which could not be divided by 4. This makes more headache to the
programmer, even during slide design in sprite animation.
What is so special about the last four sprites in the table, so that
they can correctly cover another lower priority sprite? They do
not use fast (and "blind") PSV mode, but slow byte-by-byte
comparision and transfer. This takes 18 times more time to handle
one sprite, so it should be used with special attention, and for
sprites which are not too wide (height does not matter). There is
still one possible pixel of "error" in overlapping sprites, when
the area between overlapped sprites could contain some single
transparent pixel, but this is unnoticeable on the screen.
As it was noted, there is not enough time to handle all sprites before each
scan line. Luckily, there
are two equal scan lines for every video line, so if we use both of them,
we shall have twice more time. The only problem is that there is no way to
start preparing the SPRITEBUFFER before it is completely displayed
in the second scan line. That is why, instead of SPRITEBUFFER, there
are two independent sprite buffers - SPRITEBUF1 and SPRITEBUF2.
While the video routine displayes the contents of the first one,
the second one will be prepared, and vice versa. That small
pipeline is not so confusing like it seems, and it was the last
trick which enabled the project realization.
So there are four basic steps, each of them executed before the
scan line is outputed to port:
1. Test for every sprite in SPRITELIST and calculate pointers for
the
sprites which are present in scan line N+2 (and N+3), then load COPYLIST
table with those pointers... then generate scan line N, using
SPRITEBUF1
2. Use the COPYLIST to transfer pixel data from program memory to
SPRITEBUF2... then generate the equal scan line N+1, using SPRITEBUF1
3. Test the sprites in SPRITELIST and calculate pointers if
sprites are present in scan line N+4 (and N+5), then load COPYLIST
table with those pointers... then generate the new scan line N+2, using
SPRITEBUF2
4. Use the COPYLIST to transfer pixel data from program memory to
SPRITEBUF1... then generate the equal scan line N+3, using SPRITEBUF2
By the way, SPRITEBUF1 and SPRITEBUF2 are spaced and surrounded by
three areas named DUMMUSPACE1, DUMMUSPACE2 and DUMMUSPACE3, each
of them 86 bytes wide. They are are used for nothing, except to
store dummy pixels for some sprites which are close to the borders
of the screen or even outside the screen. So X pointers can point
up to -172 to the left or (380+172-sprite width) to the right, and
the sprites will be correctly hidden if they are outside the
screen. Y pointers can be streched unlimitedly, with no special
care.
How to draw your own sprites and convert them to data
tables
Both in video memory and in sprite tables, pixels are
organized in the same way: bits
#0,#2,#4,#6 are for the
first pixel,
bits
#1,#3,#5,#7 of the same byte
for the next one, and so on. That is how they have to be arranged when
the sprite is created and the pixel data table is created. It can
be .byte or .word data list, so the video routine can access it.
Bits 16...23 of program memory are not used by video routine.
Sprite tables can be located at any page of program memory.
There is a lot of ways to create image or sprite data tables. One
possible way is to use some drawing program (e. g. Photoshop) to
create the 16-colour pallete, with colours are
arranged in this way:
| 0 Orange |
4 Dark blue |
8 Black |
12 Light blue |
| 1 Dark red |
5 Dark violet |
9 Light red |
13 Light violet |
| 2 Dark green |
6 Dark cyan |
10 Light green |
14 Light cyan |
| 3
Dark yellow |
7 Gray |
11 Light yellow |
15 White |
Now draw the sprite or slides for the animation in Indexed
Color mode (with all transparent areas painted orange), and save it in .RAW format.
If you look at the .RAW file in some hex editor, you shall see
that the colour for every pixel is represented in a single byte. Now you have
to create the simple program which converts the file to ASCII data
table, respecting bit orders represented on the drawing.
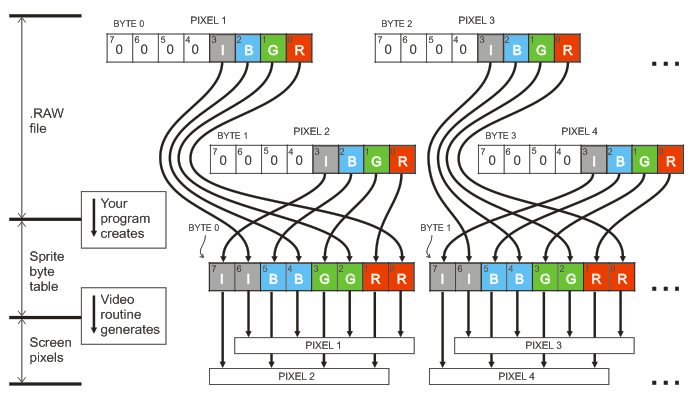
That program should create ASCII directive .WORD
or .BYTE, numeric constant prefixes 0x
(if bytes are converted to hex), commas as table separators and
line feeds, so the output should possibly look like this:
.word
0x0000,0x0000,0x8000,0xC0C0,0x0040,0x0000,0x0000,0x0000,0xC000,0xC0C0,0x0040,0x0000
.word
0x0040,0x0000,0x0000,0x0000,0xCF80,0xC5CF,0x0040,0x0000,0x0000,0x0000,0xC580,0xCFCF
.word
0xCF80,0xCACF,0x0040,0x0000,0x0000,0x0000,0xCF80,0xCFCF,0x0040,0x0000,0x0000,0x0000
.word
0x0000,0x0000,0xCF00,0x45CF,0x0000,0x0000,0x0000,0x0000,0xC300,0x00CB,0x0000,0x0000
... |
Or like this, depended on mode used:
.byte
0x00,0x00,0x04,0x08,0x12,0x18,0x1d,0x21,0x26,0x28,0x2a,0x28,0x28,0x22,0x23,0x20
.byte
0x20,0x20,0x21,0x25,0x27,0x2f,0x2f,0x2d,0x2a,0x27,0x20,0x1c,0x15,0x0e,0x00,0x02
.byte
0x0b,0x15,0x1f,0x28,0x2d,0x31,0x35,0x37,0x36,0x2b,0x20,0x1b,0x1a,0x19,0x1a,0x1b
.byte
0x1e,0x23,0x30,0x33,0x35,0x31,0x2f,0x2a,0x20,0x18,0x12,0x0a,0x00,0x24,0x37,0x38
... |
Yoy can copy this table as the text to your source file in your
application.
|

